An
An
Outdoors Niagara Exclusive!
Fishing the Niagara
River What’s an Egg Sac
or Roe Bag?
Curing your own salmon/trout
eggs
Back to Home Page
Go to Fishing the Niagara River with John Long
Back to Yellow
Sally’s page
|

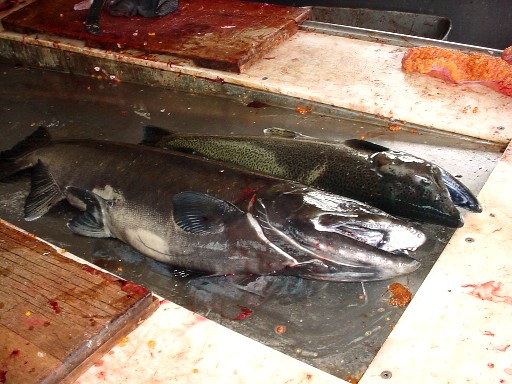
Here is a couple of Fall Niagara River
Salmon waiting to be cleaned up at the Lewiston NY fish cleaning station.
Notice the salmon eggs sitting at the right top of the photo. They are the
same ones you see in the photo on the right.
|
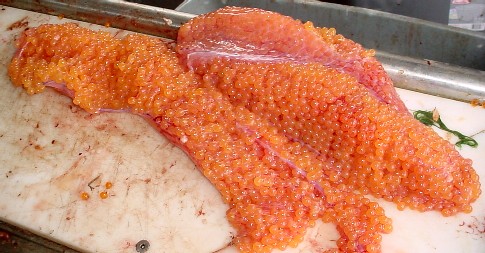
Fresh salmon eggs still in the skeins.
These are lose eggs that can be cured and either used individually or tied
in egg sacs or roe bags for drift fishing in the river or the surrounding
creeks and streams.
Be sure to click on these
photos for a bigger picture!
|
Preserving
and preparing fish eggs for fishing is reasonably simple now days because
of the many salmon preparation formulas available on the market today.
Here are some examples of productsavailable at all local bait & tackle shops. |
Go To Pautzkes web page on
Outdoors Niagara
to watch a video of retrieving your eggs from your fish
and the proper process of curing them.
GO HERE |

Click to enlarge |
These
products are available at your local bait and tackle shop where you can
get hints
on how to use this product in addition to the easy instructions
found on the container.
Cure your own egg clusters or loose eggs. These cures are available in several colors
such as Natural, pink, red, yellow, green and even more. |
|
|
|
Egg Sac or Roe Bag
Egg Sacs are nothing more
than a small batch of treated salmon or trout eggs tied into a mesh and
then tied to form a sac. Trout eggs are illegal to sell in New York
State but
|you may possess and use them if you harvest your own for your own use.
Some experts claim trout eggs are superior to salmon eggs.
Shown here are fresh hand-tied and cured egg sacs available in all local
bait & tackle shops.
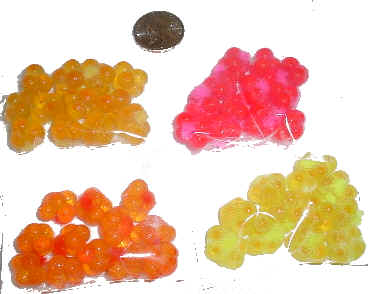
Egg sacs are generally sold by the dozen
like what is shown here in the clear plastic bags.
Top left sacs are the
natural, to the right is the fluorescent pink, lower left is fluorescent orange
and right bottom is fluorescent chartreuse
|
CURING YOUR OWN
SALMON EGGS By Captain John DeLorenzoEd Note: Captain John DeLorenzo
is the first licensed full time Charter Captain fishing the Niagara River
and Lake Ontario. His many years of experience qualifies him as the local
expert on all fishing questions. Outdoors Niagara is grateful to Captain
DeLorenzo in sharing this information.CURING YOUR EGGS FOR FALL FISHING by
Captain John DeLorenzo
One of the most frequent questions I get
asked is “how do you cure your salmon eggs?” Curing eggs is not
that hard but there are some basic steps you need to follow to get a
finished egg that is firm and has good color. Your finished product has as
much to do with how you handle your eggs before you cure them then
anything else. Your fish should be bled as soon as you catch it. Once you
bleed it out, transfer the fish immediately to a cooler with lots of ice.
Immediate cooling of your fish not only helps keeps the eggs nice but the
quality of the salmon meat is greatly improved.
Now take the eggs out of the fish and lay
on a cutting board. The key here is to move quickly, especially if is warm
out. Once the eggs are out of the fish they spoil very quickly. Eggs left
sitting for 2 or 3 hours once taken from the fish will not cure as nice as
eggs cured immediately. Make sure you have the things you need for curing
right with you so you can do your eggs right at the fish cleaning house or
at least as soon as you get home. 5 gallon bucket Gallon Size Ziploc bags
Rubber dishwashing gloves Salmon egg cure RED, HOT RED, Clear, and pink
Plastic strainer 20 mule team borax
Using a knife or sharp scissors cut the
skein length wise through the thickest part and then cut these 2 long
pieces in half so you end up with four thin short pieces from each skein.
Put the skeins in a bucket and wash with
cold water until the water is clear. This usually takes about 5 minutes.
Next drain the eggs in a strainer till no more water drips off and place
the washed skeins in a gallon Ziploc.
Next you need to know how much the eggs
weigh as you need to use 2 level tablespoons of cure per pound of eggs. A
rule of thumb is 2 skeins weigh approx. 2 lbs if the skeins are small and
3 if they were big skeins. Now measure and add the cure to the eggs. For a
2 lb batch you would use 4 tablespoons of cure. If you want them very red
use all 4 of red hot red. For a lighter egg use 3 red and 1 clear or 2 of
each. If you want to use the eggs for steelhead fishing then the 1 red and
3 pink produces a nice light egg. Now add your cure to the eggs and seal
the bag completely. Now shake and bake your eggs……If the bag isn’t
sealed you will have a mess. Keep mixing the eggs ’till a good juice
forms. Let the eggs sit in the juice for 1 hour mixing them up every 10
minutes. After 1 hour dump the eggs into the strainer and let the juice
drain off of them for 15-20 minutes. When eggs are drained lay them out on
white paper towels with heavy newspaper underneath to soak up the juice.
The eggs must dry for about 24 hours being
fixed and having fresh towels 2-3 times while drying. The curing draining
and drying should be done in a cool dry place or the eggs won’t toughen
up. Also wear your rubber gloves and don’t get any dye on you as it stains
permanently. Last take your dry eggs and place them in a clean Ziploc and
coat them liberally with borax. Shake them up good so the borax gets all
through the eggs then squeeze the air out of the bag and seal. Store in
the fridge if you will be using them in the next month or freeze them for
use later in the winter or next year. Most of the guides use this basic
method and have tried all the fancier brines and cures but find this works
as well and is simple. |
Rigging your egg sac and
skeins
First you need a secure way to fasten your sac or roe to
your hook so you are not constantly replacing it after every drift or cast. The
following knot illustration was stolen from another website a long time ago and
I can’t remember where, but at the time I thought it was the best out there. You can’t go wrong with the strongest knot to rig your egg sack.
|
Egg-Loop Knot ~ holding your
skein to the hook
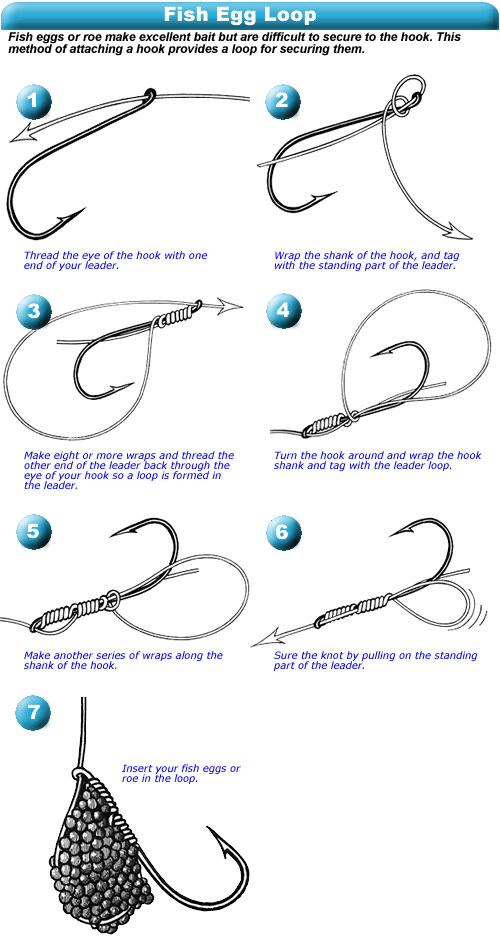
|
1. Pull about two inches of line
through the hook eye and form a loop near the bend of the hook. 2. Holding
the loop between a thumb and forefinger, bring the tag end of the line
forward and make about five wraps around the hook, wrapping towards the
eye.
3. Bring the tag end back through the loop and tighten the knot with
tension on the line in both directions.
4. The final product is a knot that slides on the hook shank so that egg
clusters and nylon yarn can be secured between the knot and the eye of the
hook.
Above Illustration stolen from http://www.fintalk.com/
|
|
Of course if you don’t have
time or the wherewithal to prepare your own eggs, local tackle shops
always have commercially made and shop prepared eggs for sale
|
Back to Home Page
top of page
Back to Yellow
Sally’s page
Go to Fishing the Niagara River with John Long